Showing posts with label Lori Whitlock Creative Team. Show all posts

Monday, July 31, 2023

Money Envelope Holder with Tag


Anita here with my last post as a Lori Whitlock Creative Team member.  It has been a wonderful seven years of designing for Lori and I will miss all of my lovely team mates.  My daughter is getting married in a little over seven weeks and I wanted to create something lovely that I could put the tips in the for the wonderful wedding vendors that we have been working with.  I used Lori's SVG called Money Holder Envelope with Tag (SVGSilhouette).  It came with the sentiment For You and I used one of Lori's fonts called Matilda (SVGSilhouette) to change the sentiment to Thank You.  This will be a lovely way to express our gratitude to all of those vendors who are helping to make my daughter's day magical.  Be sure to check this file out as you can customize it for whatever your needs are.


Hugs,


Thursday, July 6, 2023

Box Card Tropical Suitcase 2 Tutorial


Anita here with a fun summer box card that I assembled.  It is Lori's Box Card Tropical Suitcase 2 (SVGSilhouette).  I used some of Lori's Echo Park Paper collections including All About a Girl, Day in the Life No. 2 and Our Little Princess.

Here are the steps that I went through to put together this card:
1.  Cut out all the pieces.
2.  Fold all the score lines on the card base and glue the suitcase together.
3.  Glue the backing piece on the suitcase lid.  I thought this would be a great place to write a sentiment.
4.  Take your piece that is labeled as 1 and fold along the score lines at the edge.  Glue the leaves down first and then layer your flowers ending it up with the stamen and set aside.
5.  Move on to piece number 2 which is the flamingo.  Fold the score lines at the edge and glue the black layer, with the whole flamingo body onto the piece number 2.  Then add the darker pink layer which shows up on the birds back and on their face.  Finish off your flamingo with the light pink top layer of the bird and the white piece near the beak and set aside.
6.  You are now onto the palm tree, piece number 3.  Fold the edge score lines and glue down the trunk first and then the palm leaves.  I used enamel dots for the coconuts but you can use the coconuts that come with the file.
7.  Decorate the outside of your suitcase with the handle and the suitcase edges.  Glue down the edge pieces and finish with the dots included in the file or use enamel dots like I did.  
6.  I like to put the pieces into my card and view them with the card both open and closed to make sure that I am happy with the placement.  This top view photos shows where I chose to glue my tabs into the suitcase.  I always favor a wet glue when putting these box card together so that the pieces stay where I want them to.  You can also glue it in and then close the card and press it on a table to make sure that it adheres well.
Here is the card folded flat and ready to be mailed to someone who is off on an adventure this summer.
That's it for me today.  Be sure to check out all of  Lori's fun summer cards.
Hugs,


Tuesday, June 13, 2023

June Lori Whitlock Creative Team Blog Hop


It's that time again for the Lori Whitlock Creative Team blog hop and this one is for June.  I made a Box Card Father's Day Tractor (SVG, Silhouette).  I just love how cute it is and it was so easy to put together.  You should have come here from Traci Matthews Penrod's blog and will next be going to Ashley Cook's blog.  Here are photos of the front and back of the card.  Be sure to hop along to see what my fellow Creative Team Members made and to shop in Lori's SVG store for your Father's Day needs.

Hugs,


Monday, June 12, 2023

Father's Day Cabin Box Card

Anita here with a fun Father's Day card for the active/outdoorsy type of dad.  It is called Box Card Cabin (SVGSilhouette).  I used some of Lori's Echo Park Paper collections including Let's Go Anywhere, Here Comes the Sun and Halloween Party.  There were more pieces to put on the front of the card but I decided to just use the one wood grain piece for the front of my house.


As always, the beauty of a box card is that it folds flat for mailing.  Be sure to check out all of Lori's wonderful SVG's for Father's Day.

Hugs,

Tuesday, May 9, 2023

May Lori Whitlock Creative Team Blog Hop

Happy May Everyone:
Welcome to the Lori Whitlock Creative Team blog hop.  I made a beautiful butterfly card which matches two items that I am giving the birthday lady for her upcoming birthday.  This is Lori's Square Center Step Card Butterfly(SVG, Silhouette).  I used Lori's Echo Park Paper collection called Life is Beautiful.  I also cut three of each colors of the butterflies and glued them in the center only so that I could puff them up a bit to give them some more dimension.  You should have come here from Lori Whitlock's blog and will next be going to Brandie Harding Adams' blog.
Thanks for looking and have a great day.
Hugs,


Tuesday, April 11, 2023

April Lori Whitlock Creative Team Blog Hop


Hello Everyone and happy April:
Welcome to the Lori Whitlock Creative Team blog hop.  You should have come here from Lori Whitlock's blog and will next be going to Brandie Harding Adams' blog.  I made this fabulous 5X7 Happy Spring Pop Up Card that Lori designed (SVG, Silhouette). I used one of Lori's brand new Echo Park Paper collections called Life is Beautiful.  This collection is perfect for your spring paper crafting needs.
Thanks for looking and have a great day,
Hugs,


Thursday, April 6, 2023

Box Card Easter Bunny Carrot Card Tutorial


Hi Everyone:

Anita here with a tutorial on assembling Lori's Box Card Easter Bunny Carrot card (SVGSilhouette).  My grandson loves everything to do with cars and trucks and I thought that he would love this card for Easter.  Lori has so many fabulous designs, be sure to check them out for your spring card needs.

Here are the pieces for this fun, interactive card.

Glue the pieces that go together and set them aside for now.

Here is the box glued together and the bunny glued inside it.  When making these cards I always fold them closed to make sure that things are lining up like I want them to.

Here is a top view where you can see where the bunny center piece was placed within the car body.

Here is the back of the card.  I love the way Lori has the sentiment and room for me to write my grandson a message.

Here is the card folded flat and ready for mailing.

That's it for me today.  I hope that you have  a wonderful spring weekend this weekend.  Happy Easter for those that celebrate it.

Hugs,


Tuesday, February 14, 2023

February Lori Whitlock Creative Team Blog Hop


Welcome to the February Lori Whitlock Creative Team Blog Hop.  Happy Valentine's Day! You should have come here from Traci Matthews Penrod's blog and will next be going to Brandie Harding Adams' blog.  I decided to make Lori's Valentine Card Crayon Holder Dog (SVG, Silhouette), Frog (SVGSilhouette).  These are a print and cut file and so easy to put together.  I would suggest a heavier cardstock for the base or gluing together two layers of cardstock so that your crayons stay where they are supposed to.  Be sure to check out all of Lori's Print and Cut Valentines, so much cuter than what you can find in the store.


Hugs,


Thursday, January 26, 2023

Altering a Candy Box to fit a larger candy bar


Hello Everyone:
Anita here with a quick tutorial on taking one of Lori's Candy Box SVG's and resizing them to fit the candy bar size that I need.  I used Candy Box 6 Candies (SVGSilhouette).  I used Lori's two Echo Park Paper collections including Our Little Princess and All About a Girl.  
I wanted to make my own chocolate bars for Valentine's Day given that there are food allergies in our family and wanted a pretty box to put them in.  I picked this box as it seemed like it would fit the candy bar mold that I have.  This file comes in two parts, Part 2 is for the box and part 1 is for the scalloped inserts.  I used Part 2.  When I imported my file into Silhouette Studio I used the grid lines on my mat on the screen to determine the size of the unaltered file.  I knew what size I needed to fit my candy bar and with the file still grouped together I dragged the corner until the dimensions were what I needed them to be.  Be sure that you don't ungroup them before doing the resizing.  As you can see from the photo above I did a pretty good job of getting my box to fit my candy bar.  

These are the cut file pieces for my box.  I opted to use the decorate overlay around the inner edge but you wouldn't have to if you were short on time.  I also often put an acrylic sheet over the opening when making boxes but decided that the chocolate bar looked better with the hole open.

These are the box pieces assembled and ready for my chocolate bar. That's it for me.  Be sure to check out all of Lori's Valentine's Day files.
Hugs,

Monday, December 19, 2022

Double Sliding Card Thank You

 Hello Everyone:

Anita here with a fun Holiday Thank You card.  I am always so appreciative of being thought of at this time of year and Lori has this great Double Sliding Card Thank You (SVG, Silhouette) which I assembled to send out to a special couple of people.  I used one of Lori's Echo Park Paper collections called Christmas Magic.  Lori also has a tutorial to put together this card which you can find here, Tutorial part 1 & 2.

Thanks for looking and have a great day.

Hugs,

Tuesday, December 13, 2022

December Lori Whitlock Creative Team Blog Hop


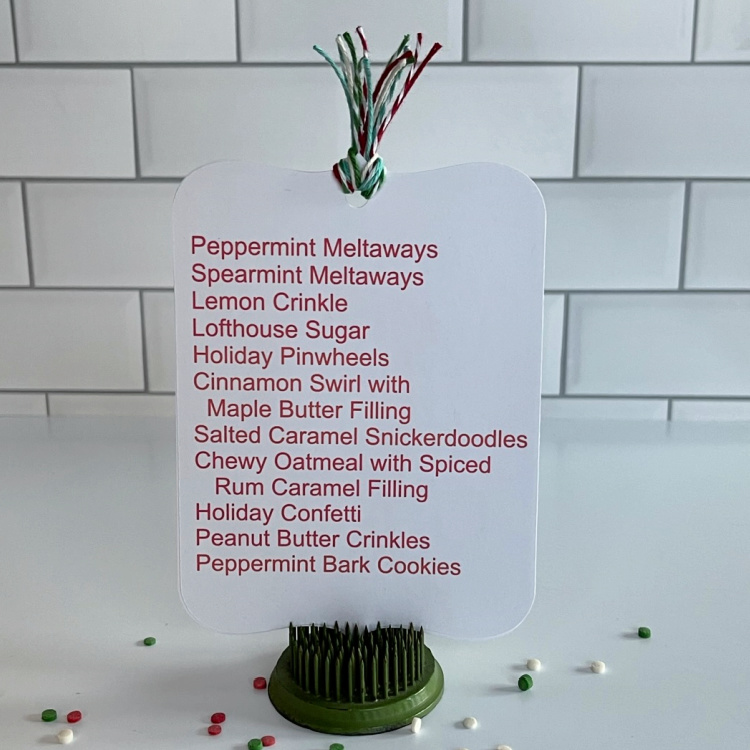
Welcome to the December Lori Whitlock Blog Hop.  You should have come here from Kathleen Skou's blog and will next be going to Brandie Harding Adam 's blog.  I make a lot of cookie packages up which I mail out each holiday season.  This year I made 11 different kinds so I decided to use Lori's Christmas Labels Print and Cut 5 (SVG, Silhouette) to create a tag and I cut another one that has the cookies types on it and glued them together.  Hopefully, they will love the tag as well as knowing what kinds of cookies are in their tin.  Print and cut files are so easy to use and will help you get more done during this busy holiday season.


Hugs,


Thursday, November 17, 2022

Pumpkin Pie Tutorial


Hi Everyone:
I can't believe that it is the week before Thanksgiving.  I am here with a tutorial to show how I assembled Lori's 3D Pumpkin.  I'm going to fill them with chocolates and put my pie on the dessert table on Thanksgiving.  I used Lori's 3D Pumpkin Pie Box file (SVGSilhouette).  I used some of Lori's Echo Park Paper collections including:  A Slice of Summer, Let's Go Anywhere, All About a Girl and  Halloween Party.  This file is part of the November Kit of the Month in Lori's SVG shop.  It's a great bundle, be sure to check it out, Lori's Shop 

Here are the pieces that I cut out for the pie.  If you want to make a full pie, you will need to cut out the pieces for 8 slices.  The file tells you how many to cut out.  I used some acetate for the hearts on the pumpkin pie box and some white and cream hearts for the other types of pie.I glued the acetate or solid color heart onto the box top before I put it together.This photo shows the three box pieces ready for the pie crust to be glued onto the end of the pie.Here is a side view of the pumpkin pie box assembled and ready for treats.

I like pumpkin pie but also like other kinds as well.  I decided to make blueberry, cherry, lemon and chocolate cream slices as well.  The sky is the limit for what kind of pie you want to make.  

Hugs,

Tuesday, August 9, 2022

August Lori Whitlock Creative Team Blog Hop


Anita here with a fun mermaid card that just spoke to my soul.  I made two to send to two of my friends.  Lori's file is called Pop Up Box Card Mermaid 2 (SVGSilhouette) and I used some of her Echo Park Paper collections including Wish Upon a Star, Endless Summer and All About a Girl.  You should have come here from  Lori's blog and will next be going to Brandie Harding Adams' blog.

Here the card is folded flat for mailing.


Thanks for looking and have a great day.
Hugs,