Showing posts with label Sewing. Show all posts

Tuesday, March 10, 2020

March Lori Whitlock Creative Team Blog Hop


Hi Everyone:
Welcome to the Lori Whitlock March blog hop.  You should have come here from  Kathy Skou's blog and will next be going to  Brandie Adams's blog.  I made this fun set of Shadow Box Sewing cards.  They can be found in a bundle here in Lori's store and here separately in the Silhouette Design store.  The first one on the left is called Shadow Box Card Scene Homemade and the middle one is called Shadow Box Card Scene Bobbin and the far right one is called Shadow Box Card Scene Sewing.  I used some fun Doodlebug papers to complete these projects.


This photo shows the card laying flat.


Hugs,

Monday, March 12, 2018

Quilting Weekend Goodie Set

Hi:
Happy March everyone.  I am so excited to share my project for today.  I love to sew and quilt and am going away for a long weekend with my good friends to quilt.  I made this adorable box of Lori's and used her Echo Park line called I'd Rather Be Crafting.  I also used stickers from that collection.  The handle is held on with brads from several different of her Echo Park collections.  The cut file I used for the box is called Basket with Flower and can be found here in Lori's shop and here in the Silhouette store.  I also used the bow from the Matchbox Drawer Card Bow which is here in Lori's store and here in the Silhouette store.  I cut 1/4" pieces of cardstock and wound it around a pen to achieve my curls.
I also made pie tin pincushions to give to my friends along with their spring Chex Mix.
Thanks for looking and enjoy the rest of your day.
Hugs,


Saturday, January 30, 2016

XOXO Table Runner

You know when you are touched by kindness that you didn't expect but were so grateful to receive?  I received a message from Samantha Walker who knows how much I love to sew and quilt offering to send me some of her lovely Riley Blake fabric.  I received a gorgeous box of amazing fabric and for my tutorial for today I chose to use a Doohickey Designs pattern which you can find in the Digi Playground store.  
I love using my Silhouette to cut out fabric with fusible web on the back and then use simple applique on my sewing machine.  

1.  The pattern gives dimensions for you to cut for the pieces but I opted to make my pieces 6X6" so that I could fit four on my mat.  I used a Cricut Strong Grip mat which I only use for fabric.  
2.  I cut the fusible interfacing 1/4" smaller than the 6x6" square so that I don't get any of the fusible goo on my iron and ironing board.  
3.  Iron the fusible interfacing onto the back of the fabric squares.
4.  After cool peel off the paper and stick the fabric square down on your mat.
5.  Use a brayer to make sure that the fabric will not move when you are cutting it.
6.  Use a Silhouette Fabric Blade in your machine and I use the cutting selection for fabric and always have it double cut.  
7.  Check your cut before you take your mat out of your machine and cut again if necessary.

With this pattern you always have the option to cut the templates out of paper and trace them onto your paper backed fusible web.  I would then iron the paper web onto the back of your fabric square and cut it out on your pencil line.
8.  Carefully take your fabric pieces off your mat.  You might have to snip a few threads so have a sharp pair of scissors handy.
9.  Iron your pieces following the pattern onto the background pieces you have cut according to the pattern directions.
10.  I used a blanket stitch on my machine with matching thread to applique my pieces down.  You can see them laid out ready to be stitched above.
11.  Assemble the table runner and quilt and bind as desired.  I machine quilted mine using a paper quilting template of roses.
Table runners are such an elegant gift and brighten any room and don't take very much fabric or effort.  Be sure to share with  us if you try this one.
Hugs,

Thursday, May 28, 2015

Showering you with Love


Welcome to my Outside the Box blog post for the CardMaker Magazine Blog DT.  We were tasked with picking a card from an older issue of CardMaker and recreating it with newer products.  I chose a card called Showering you with Love by Aixa Mercado that was in the Spring 2013 issue of CardMaker Magazine.  She made a lovely baby card and I used mine for a bridal shower for my daughter-in-law to be.
I bought a Silhouette cut file called Here Comes The Bride and it had the heart and rings as part of the file.  I resized them until they were the perfect size for me.
I added a little extra bling with a few sequins which are so trendy right now.  How often do you go through your old magazines and think about recreating a card?  I'm going to be doing it more often as it was so easy and fun.
Supplies Used:  Crate Paper Kiss Kiss, Here Comes the Bride, Silhouette Cut File #43536 by Megan Hardy Designs, Pretty Pink Posh Sequins, Sewing Machine, Silhouette Cameo, Laser Printer
Hugs,


Saturday, May 2, 2015

Graduation Banner Tutorial

Hi Everyone:
Happy Saturday.  I am here with a tutorial on how to make the most of your cutting mats when you are making a lot of cuts for one design.  I created this graduation banner for my son who is graduating from Northeastern University on 5/7/15.  We are so proud of how hard he has worked to be a mechanical engineer.
This Spring Banner pattern by Doohikey Designs comes with wonderful, easy to follow directions and allows you to either cut the paper to use as a template and/or use fabric to be cut in your machine.  I decided to cut out a full sheet of templates and then traced that shape onto the back of my fabric.  I then cut the banner pieces out with pinking shears.
I knew that I wanted to make several different sizes of the graduation caps and the stars that are part of Jamie Cripps' 3D Grad Envelope Bag and I wanted to fill my cutting mat so as to not waste paper.  The original cut file is below.  I ungrouped them and got rid of the envelope and band.  I copied the star and grad cap and pasted them onto my mat. 


  I then resized one set of them and grouped all four together.


Next I copied the grouped set and pasted it on my mat until I filled it up.
I wanted to plenty of black and red stars and grad caps to choose from to embellish my project.  There are so many things that you can do with your cutting system and these very versatile cut files from DigiPlayground. 
I mixed paper and fabric with my banner because it only needs to look nice for his party.  I fell in love with this font set called Squeeze Me from Rivka Wilkins.  You can find the link for it below. 
I laid everything out first to see how it would look and then used foam tape and fabric glue to adhere the parts of my banner.

This was a fun and easy project and I know my son will love the personalized grad banner.
Hugs,
Anita
Project Cut Files:
Spring Banner
Spring Banner by Shari for Doohikey Designs
3d graduation envelope bag
3 D Grad Envelope Bag by Jamie Cripps
Squeeze Me Font OTF

Squeeze Me by Rivka Wilkins

Monday, April 6, 2015

IPad Case

Happy Monday:

I hope that you had a nice weekend everyone.  I created an Ipad case today using some lovely fabric from the Esty Store called Love My Fabrics.  There are so many wonderful collections there that you just have to check out.  My post is also on the Love My Fabric Blog which you can check out and see what my fellow designers have been up to.

I used a pattern from Indygo Junction by Amy Barickman for  a Tech Pocket & Portfolio.  I made the tablet portfolio to fit my larger Ipad and to have the pockets that are included in the pattern.

This whipped up quickly and let me use all the fabrics in the collection which was really fun.  I also created some rolled fabric flowers and made a You Tube video to show you how I did it.  You can view the video here.  Hope that you have a chance to check it out.


Here is a close up of the pockets on the left side.  There are three small ones and two larger one's as well as another one under the Ipad.  Lots of storage spaces.

Thanks for looking and be sure to pop on over to the Love My Fabrics store to see some of our wonderful new collections.
Hugs,


Friday, March 20, 2015

Squarely Quilted


I am so in love with these new fabrics from Love My Fabrics.  I whipped up this quick quilt in a weekend using this gorgeous grey, navy and bright yellow coordinating fabric. The pattern is called Little P Though the Looking Glass by It's Sew Emma.   Be sure to check out the Love My Fabrics store and sister Love My Tapes store on Etsy.  The quilting was done by Quilts Everlasting.  Debbie is fabulous and does such a wonderful job.  Use my name if you send anything her way to be quilted.
Hugs,

Tuesday, March 10, 2015

Love My Fabrics Hexi Pillow

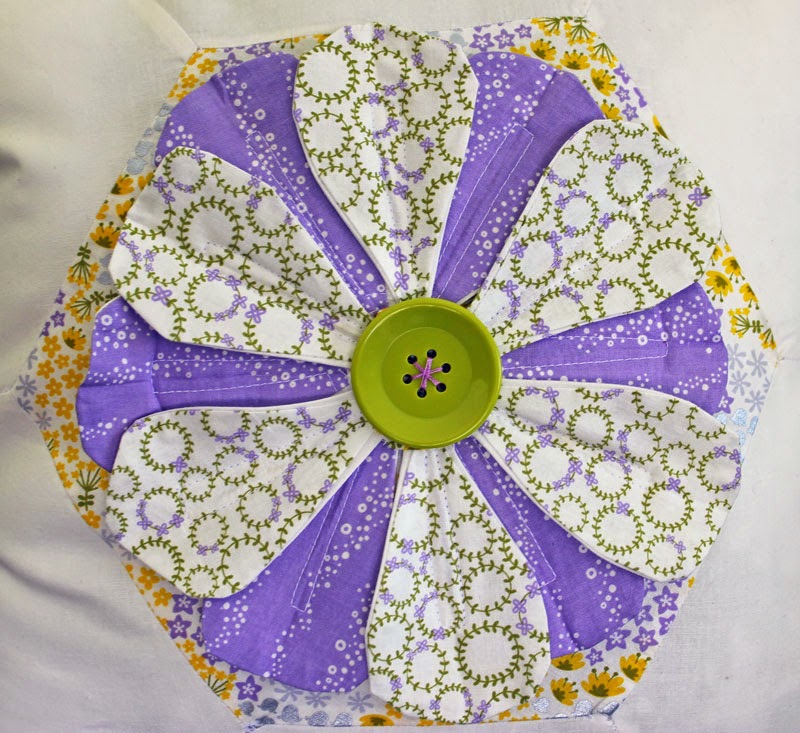
I am so excited to share my first post for the Love My Fabric store using their lovely fabric.  I made this pillow for Mother's Day for my mother.  I had fun making piping which I hadn't done in a really long time.  I used the Louise Garden Quilt Pattern for the pillow and the instructions and template are fabulous.

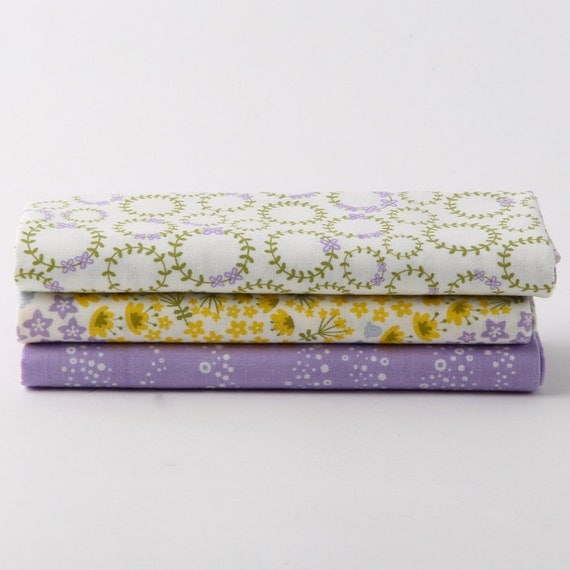
Wildflower Fat Quarter Bundle
Cotton Fabric - Wildflower- Fat quarter bundle


This fat quarter bundle comes pre-designed with hand-selected coordinating fabrics that are very cute and flattering together. Each fabric in the bundle complements the other in a very eye-appealing way. 
Here are some close-ups of my pillow.

I took some photos for you of how I made my piping.  It is a great accent to so many projects.  Here are the steps that I followed:
1.  Determine the width of your bias by taking your cording size and multiplying it by two.  Then multiply the seam allowance .25 by two and add those together.  I had 1/2" cording so I multiplied (2 X .5) + (2 X .5) = 2 inch wide bias strips.
2.  Next to find the length of piping you will need double the pillow's width and length and then add an additional 4 inches.  Mine was 17" square so my formula looked like this (2 X 17) + (2 X 17) +4 =72 inches.  So I needed at least 72 inches of 2" wide bias strips.
3.  Fold the bottom left corner of your fabric up to and matching the top edge.  The fold that this makes is your bias and you are going to want to mark that line with a removable marker.
4.  You will then take your ruler and draw lines on either side of the main line two inches apart until you have enough length for the measurement from above.
5.  Your ends will have an angle to them and you need to trim them up.
6.  You will then need to match up your strips as shown below and draw a line down from the left corner as this will be your stitching line.
Once they are all sewn together you will have one long strip of bias tape that is ready to use however you want.
Hope you have found this helpful and have a great day.  Be sure to click on the link for the store and check out all the wonderful fabric.
Hugs,


Monday, March 2, 2015

Paper Issues Enamored with Enamel Issue

Hey Everyone:
This is my first Issue post with Paper Issues and I had a lot of fun working with this lovely kit from Paper Camelia  January Everyday Life and Add-On Kits with lots of gorgeous papers and really fun embellishments.  Below are all the links for Paper Camelia's store, Facebook, etc.

Prize: March Main Kit


Saturday, February 14, 2015

Bee Mine

 Sharing this card that I made at a recent crop using brand new Doodlebug papers and embellishments called Doodlebug Lovebugs which I bought in the Paper Issues store.  You can find the collection and embellishments here.


Lovebugs 6x6 Paper Pad Doodlebug DesignLove Bug Bee Doodle Pops 3-D Cardstock Stickers-Doodlebug
Don't forget that you can use my code to shop in the store and save 20%.  Happy Valentine's Day.
Hugs,


Tuesday, January 13, 2015

My Creative Sewing Space

Anita here sharing my sewing space.  I took over my son's bedroom when he moved out so this is his desk, but it works for my needs.
I got a new sewing machine and I love my Viking Husqvarna Sapphine 960Q which I got as a gift last Mother's Day.

I love how much room there is to sew to the right of the needle.

Here it is all lit up and ready to go.  Happy sewing.  Be back soon with some projects on the Love My Fabrics blog.