Showing posts with label CardMaker Magazine. Show all posts

Friday, November 13, 2015

Outside the Box Card Maker Magazine Guest DT

Hello Everyone:
I am thrilled to be guest designing today for CardMaker Magazine.  I decided to have some fun looking through my old CardMaker magazines and found a really fun card and tutorial for tea-bag folding in the Spring 2015 issue.  The card is called Welcome Baby and is on page 75 of that issue with easy and clear directions on page 72, all by the fabulous Sharon M. Reinhart.
My friend is a big baseball fan and she roots for the Kansas City Royals and in honor of their amazing World Series win I decided to make a tea bag folder baseball.  This is a congratulations card for her in honor of their win.  I used Home Run by Doodlebug for my card.


The ball was so easy to make and this is a side view so that you can see the dimension the folds gives to your projects.
Supplies Used:  Doodlebug Home Run patterned paper and embellishments, Bazzill cardstock, Tea-Bag Folding technique by Sharon M. Reinhart.
Hugs,
Anita


Saturday, September 12, 2015

An Apple for Teacher


An Apple for Teacher

Hi Everyone:
I hope that everyone had a great summer.  I am so excited to be back guest designing today with a card making tip/technique that is one of my favorites.  I am talking about making shaker cards.  I just love how fun and festive they are.

I used my Silhouette and cut two apple templates out of acetate sheets from my personal stash.  You could use vellum also and I have also used transparency sheets which you can get at an office supply store.  It was thick so I had to use double cut.  The cut file is from Lettering Delights #22835 and can be found in the Silhouette store.
I used one of My Favorite Things awesome dies called Polka Dot Cover-Up and used the dots that were left behind for my shaker material.
I then laid one acetate apple down on my mat and put the dots in the middle.  I put the other one gently on top and was ready to sew.  The dots move a bit so I kept stopping to push them back in.
Here is it all sewn.
I had cut two more apples, one in green and one in brown and then trimmed the paper so that I could have a green leaf and a brown stem.
Shaker cards are so fun and interactive, I hope that you have a chance to give one a try.
Supplies Used:  Black and white Cardstock:  Bazzill, Back to School by Doodlebug, Clear Acetate sheet from my personal stash, Polka Dot Cover-Up and Scalloped Border Dies from My Favorite Things, Apple Cut File from Lettering Delights #22835, Sizzix Big Kick, Sewing Machine
Hugs,
Anita


Friday, July 24, 2015

CardMaker Birthday


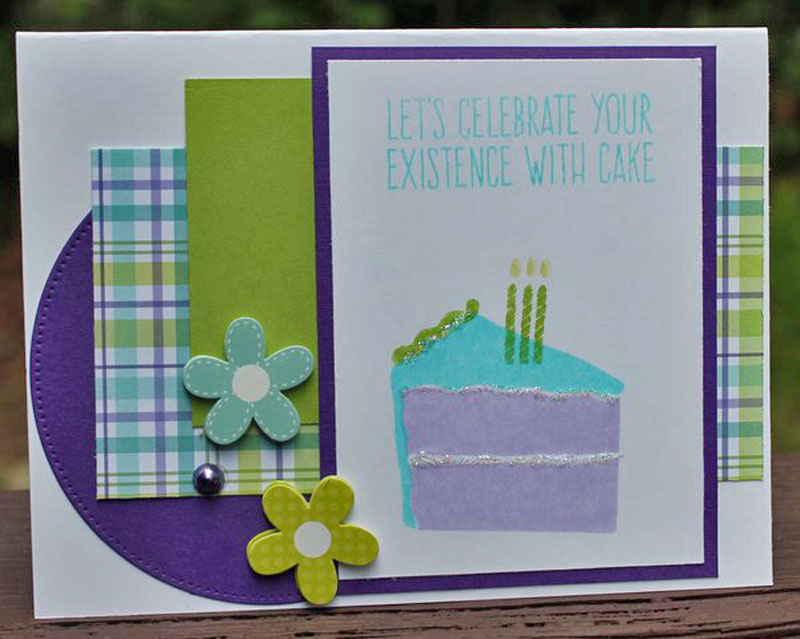
Happy Friday everyone.  I am so thrilled to be back guest designing for my favorite magazine and blog, CardMaker.  I love browsing on Pinterest and probably spend way too much time doing it.  I fell in love with this color palette and knew that they would match the plaid paper which I had just bought from My Favorite Things. 
I used some wonderful inks from My Favorite Things which match the papers beautifully and finished off my card with some sparkly Stickles.

 Project Materials:  Stampin' Up and Gina K. Cardstock, My Favorite Things Plaid Patterns, My Favorite ThingsPierced Circle Stax Die, Doodlebug Doodlepops and Jewel, Stickles, My Favorite Things Ink Banana Split, Sour Apple, Blu Raspberry, Grapesicle, My Favorite Things Piece of Cake Stamp Set  
Hugs,


Thursday, July 2, 2015

Happy Fourth of July Lighthouse


One of my most favorite holidays is the fourth of July. I made this little light house gift holder which is sitting on my desk right now making me a very happy lady.
The lighthouse has three separate parts which is kind of cool.  This is the top.  I used Light House Favor Box cut file from Silhouette by Sweet Afton #80203 for this adorable treat holder.
Here is the bottom of the box which would hold some M&M's or other small candy nicely.
Here is the top of the box which is decorated with a ships wheel.  I used Doodlebug's Patriotic Parade and just love this collection.
This is my last post as a CardMaker Blog DT member and I will miss posting on a regular basis.  I'll still be around and can't wait to see what the new team creates.
Project Materials:  Doodlebug Patriotic Parade, Silhouette Light House Favor Box #80203 by Sweet Afton.
Hugs,


Wednesday, June 24, 2015

You Inspire Me

Hello everyone and happy summer.  I had a lot of fun looking around Pinterest to find something to inspire me for the card which I made today.  I love summer, cute food and bright colors and the photo below met all of these goals for me.
Isn't this just so pretty?  I love those paper straws and the colors are so yummy and inviting.
Here is the card that I created using some thin felt to make these fun loopy flowers and using a paper straw to display my sentiment.

I love to use my washi tape to create a card background and was so excited to find this one in my stash from Doodlebug that perfectly matched the straw in the photo.  It is so easy to lay down the washi and then take sharp scissors and trim around the card front.
Here's a close up of my loopy flower.  I mixed and matched the colors to create some dimension in my flowers.
I tried out the new Hero Arts Ombre ink for the sentiment and the effect is subtle which I loved.  Hope you have a great day and thanks for looking.
Project Materials:  Bazzill Cardstock, My Favorite Things Dynamics Wood Grain Fence, Loopy Bloom, Hero Arts Ombre Ink Pink to Red, Doodlebug Washi Tape, Thin Felt from a craft store, Paper Straw from personal stash, Fiskars All Around Quotes stamp set #01-005513.
Hugs,


Monday, June 22, 2015

CardMaker Magazine and Avery Elle Blog Hop


Hello Everyone:
Happy Monday and welcome to the CardMaker Magazine and Avery Elle blog hop.  You should have come to my blog via Caryn Davies wonderful blog and will next be going to Yainea's awesome blog to see what she created.  If you did not come here via that path please start at the beginning at the CardMaker Blog.
I was so lucky to be sent some wonderful Avery Elle items from their brand new release a Geek Love stamp set and matching Geek Love Die.  I had such fun creating this card with these dies and stamps.  The stamps are awesome and so easy to work with and the dies cut perfectly.
My daughter is a nerd and she is starting an EMT class tomorrow, she already has her CNA and is trying to get more experience before her senior year in college and applying to Physician Assistant Graduate school.  She is an overachiever and kind of nervous so I thought this fun card would make her laugh.
Be sure to hop all the way through to see what my fellow participants have created for you.  There will be a prize offered on the Avery Elle blog.

CardMaker: http://www.cardmakermagazine.com/blog/ <  - - - - - -  Start the hop here
Katie Gehring - www.katiegehring.blogspot.com
Caryn Davies- www.glittermesilly.com  < - - - - - - - you should have come from here
Yainea - http://mypaperjourney.blogspot.com/ < - - - - - - - - you are going here next
Melania - melaniadeasy.blogspot.com
JJ - www.jjbolton.org
Karolyn - karolyns-paperkraft.blogspot.com
Jamie - blog.averyelle.com
Project Materials:  Stampin' Up Cardstock, Atlas by Pink Paislee patterned paper, Avery Elle Geek Love stamp set and matching die set, Sizzix Big Kick, Pop up Glue Dots, The Twinery twine, Memento Tuxedo Black ink, Copic Markers
Hugs,


Wednesday, June 10, 2015

CardMaker and Ellison/Sizzix Blog Hop


Hey there CardMaker and Ellison/Sizzix lovers.  We have been having a blast since June 2nd with a hop with designers from both Ellison/Sizzix and CardMaker. You can go back to the CardMaker blog to see what you have missed.  I was so lucky to be able to play with this gorgeous die set called Happy Birthday Step Ups.  It is so easy to use and there are so many different pieces that you can coordinate your project in any way that you wish.   They also sent me those gorgeous mint colored cutting pads.  Drool, they sure are gorgeous and so much fun.

Here is a close up of the card.
Here is a close up of the cupcake gift box.  Can't wait to decide who to give this to.  Thanks for hopping and be sure that you go to Jeanne Streiff's blog.  Link is below.  I have always loved her work and can't wait to see what she created for you all.


Sizzix Framelits Happy Birthday Step Ups #660142
Sizzix Cutting Pair Standard Mint #660522

 Sizzix will be giving ONE LUCKY WINNER a Sizzix Big Shot Machine, their choice of 3 Stephanie Barnard dies from her latest cardmaking Sizzix collection as well as a YEAR subscription to CardMakermagazine! All of the details for the giveaway and how you can enter for a chance to win can be found on Sizzix’s site.


Project Materials:
Lawn Fawn Vanilla Polka, Lemon Polka, Milk Chocolate Polka, Line Dance
Ellison/Sizzix Happy Birthday Step Ups #660142
Ellison/Sizzix Pair Standard Mint #660522
Doodlebug Sprinkles
White Ribbon
Silhouette Cut File Cherry on Top 3D Cupcake Box #55160
Ellison/Sizzix Big Kick
Silhouette Cameo


Hugs,
Anita

Thursday, May 28, 2015

Showering you with Love


Welcome to my Outside the Box blog post for the CardMaker Magazine Blog DT.  We were tasked with picking a card from an older issue of CardMaker and recreating it with newer products.  I chose a card called Showering you with Love by Aixa Mercado that was in the Spring 2013 issue of CardMaker Magazine.  She made a lovely baby card and I used mine for a bridal shower for my daughter-in-law to be.
I bought a Silhouette cut file called Here Comes The Bride and it had the heart and rings as part of the file.  I resized them until they were the perfect size for me.
I added a little extra bling with a few sequins which are so trendy right now.  How often do you go through your old magazines and think about recreating a card?  I'm going to be doing it more often as it was so easy and fun.
Supplies Used:  Crate Paper Kiss Kiss, Here Comes the Bride, Silhouette Cut File #43536 by Megan Hardy Designs, Pretty Pink Posh Sequins, Sewing Machine, Silhouette Cameo, Laser Printer
Hugs,


Monday, May 18, 2015

Pretty Pink Posh Blog Hop

Welcome to my blog and the Pretty Pink Posh and CardMaker Magazine blog hop.  You should have arrived here from Sarah Ashley's blog.  The link is below.  If you didn't come that way, you should start at the beginning because there is a lot of great crafty projects along the way and a prize to be won.

Blog Hop List
CardMaker: http://www.cardmakermagazine.com/blog/ < - - - - - - - the hop beginning
Anita Mulcahey: http://happypapercrafthappenings.blogspot.com/  <  - - - - - - - - - - You are here
Lois Bak: http://clownmomcreations.blogspot.com/ < - - - - - - - - - You are going here next


 My son just graduated from Northeastern University in Boston and his school colors are red, white and black.  I used my Silhouette to create the card front with the words cut out.  I adore shaker cards and thought this would be something different for him.  I used the Sparkling Clear sequins and Silver Confetti along with a touch of glitter from Melissa Frances.  I finished off my card with some twine from The Twinery and some enamel dots from Doodlebug.

Here is a bright and cheery card that I made using Pretty Pink Posh's Stitched Banner Duo and Stitched Labels 1.  I love how bright and fun these Doodlebug papers are and they are perfect with these fabulous dies.  I also used three different colors/types of sequins on my card.  Sequins make me happy.


This is my final project for today's hop and I created a gift box and made a shaker out of a lei cut file from Silhouette,  The springtime mix of sequins has a lovely white flower in it which gave me the idea to make a flower shaped shaker.  Shakers are not just for cards and you can use them on so many things.
Thanks for looking at my projects and be sure to hop along and comment at Pretty Pink Posh for a chance to win some goodies.
Pretty Pink Posh will be hosting a giveaway on their blog on Monday, 5/18/15. The list of what is included in the giveaway is listed below. Here is a link to the blog: http://prettypinkposh.com/blog

Description of giveaway
Stitched Borders 1 die cuts
Stitched Banner Duo 2 die cuts
6mm Sparkling Clear sequins
6mm Marigold sequins
6mm Espresso sequins
6mm Mossy Green sequins
6mm Pink Peonies sequins
Silver Confetti
Silver Star Confetti

Project Materials:
Pretty Pink Posh Items:
Watermelon Sequins 4mm
Lilac Garden Flowers Sequins
Springtime Mix Sequins 6mm
Sparkling Clear Sequins 6mm
Silver Confetti 6mm
Stiched Banner Duo 
Stitched Labels 1

Doodlebug Hello Sunshine Paper Pack
Doodlebug Enamel Dots
Sizzix Big Kick
Silhouette Cameo
Bazzill Cardstock
Grosgrain Ribbon from stash

Silhouette Cut Files:
#60294 Congrats Grad Phrase by Kolette Hall
#12700 Flower Lei by Jamie Koay
#27691 3d Scalloped Circle Gift Box by Samantha Walker
#25278 Thank You Phrase by Kristen Magee
Hugs,


Monday, April 27, 2015

Die Storage System

Hi:

Anita here with my system for die storage.  I have picked up bits and pieces to make up this system as I perused blogs and Pinterest.  I can always find what I am looking for with this system and I don't lose any of the smaller pieces.  My post is on the CardMaker Blog today.

I bought kitchen bins from Amazon.com and you can find the link and current price below.  They measure 10X6X3" which is perfect for fitting the envelopes.  The bins come in a longer length as well.  This was the size that fits perfectly on my craft shelf.

I bought Memorex CD/DVD keepers plastic sleeves in a 50 pack for my smaller dies. They came from Amazon as well with the link below. 
These envelopes are so nice and sturdy and you can clearly see what the die set is.  I also took a photo of the back so that you could see how nicely they close as well.
There are some dies that don't fit in this envelope or have coordinating stamp sets so I needed a larger envelope as well.  I bought Avery Elle Stamp & Die Storage Pockets which you can find the link to below as well.

I used project life 4X6" cards and my label maker to label each set.  You can use whatever size 4X6" paper you like.  It will take some work to get it set up, but it will be so pretty and organized when you are done.  Happy organizing.
Hugs,
Anita


Project Supplies:
Avery Elle Stamp & Die Storage Pockets #SS-25 25 pack for $9.00
 Amazon.com
Project Life by Becky Higgins 4X6" cards


Wednesday, April 15, 2015

Happy Day Watercoloring


Anita here with a fun water coloring technique that is so pretty for those spring and summer cards.
Here are the supplies that you are going to need for this project.  The embossing powder is white.
Here is the image before embossing and after.  You are going to want to make sure that your VersaMark or other embossing ink pad is juicy enough to pick up all the details in your stamp.

The white embossing really pops on the kraft paper but any dark color would also work really well.  You want to choose a stamp set that has spaces that are not embossed that you will be able to add color into.
I used an aqua painter but a regular paint brush and a cup of water will work just as well.  You are going to want to paint a thin layer of white watercolor over the whole image.
Next you are going to add color. This photo was taken when the paint was still wet.  You can apply color and then move the color by adding some more water to your paint brush.  You need to be careful with this paper though because it is not watercolor paper and it might start to break down with too much water.  You could also certainly use watercolor paper which I have used previously as well.
Here is a cropped photo close up of the flower painting.  Thanks for looking and have a great day.
Hugs,
Anita
Supplies Used:  Stampendous Daily Thanks stamp set, Bazzill kraft and white papers, American Crafts, Dear Lizzy Serendipity patterned papers 6X6 pad, Versamark and Memento ink, Stampin' Up white embossing powder, Michael's watercolor paint set, aqua painter


Friday, April 3, 2015

Home Sweet Home Card Tip

Hey There Fellow Card Makers:
Anita here to share with you a new twist on and old technique.  I am sharing with how I made the background for my card using baby wipes and various mists.
This is a photo of the mists that I used.  I chose my patterned paper and then matched that to my mists.  This technique has always called for reinkers, but I don't have any of those any more.  I never used them so I got rid of them, but I do have plenty of mists.
I used a plastic coated craft mat to spray the four mist colors on.  You could use wax paper if you don't have a craft mat.
I then took a baby wipe that I made extra wet and dabbed it into the four colors, trying to spread them out.
I used white cardstock and made lines for my card with my wipe.  You can go back and touch it up if you miss any spots or need to add any colors.  You can make any design that you want with the wipe.  This gave me a perfectly matching background for my card.
The lines match the design on my flair, which was what I intended.  Hope that you have a chance to try this out for yourself.
Supplies Used:
Paper Sweeties Home Sweet Home stamp set
Lawn Fawn Beachside
Stampin' Up Cardstock
Baby Wipes Huggies
Spray Mists, Summer Sky, Prima, Heidi Swapp Color Shine Coral and Navy, Mister Huey's Dewey
A Flair for Buttons Watercolor Words
Martha Stewart Pearls
Memento Tuxedo Black Ink
Hugs,